
|
25 Images You Won't Believe Weren't Photoshopped
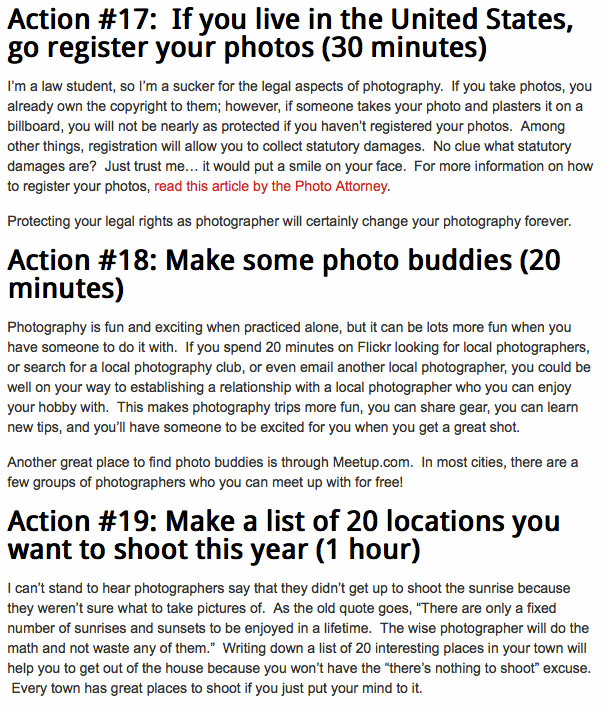
Lion Pride, Serengeti

July 24, 2013
Lion Pride, Serengeti
Photograph by Michael Nichols, National Geographic
This Month in Photo of the Day: Animal Pictures
A pride of lions rests on a kopje, or rocky outcrop, near a favorite water hole in the Serengeti. Lions use kopjes as havens and outlooks on the plains. When the rains bring green grass, wildebeests arrive in vast herds.
See more pictures from the August 2013 feature story "The Short Happy Life of a Serengeti Lion."
See more photos of big cats »
Source: http://photography.nationalgeographic.com/photography/photo-of-the-day/lion-pride-kopje-nichols/?utm_source=Facebook&utm_medium=Social&utm_content=link_fb20130724photo-pod&utm_campaign=Content
‘Photo’synthesis, the making of a chlorophyll canvas.
What happens when growing grass, varying light levels, and a photo negative coalesce? A modern interpretation of photosynthesis develops.
The process goes like this: A sheet of lawn provides the needed photosensitive surface which is placed in a giant darkroom and exposed to a 400-watt projector bulb passing through a photo negative for prolonged periods of time. The varying densities of the negative’s lighter and darker areas produce a full range of midtones by controlling the light levels in each area. Full bright light produces green, or darker tones, lack of light produces yellow tones.
“It’s very much like developing a black-and-white photograph,” Harvey said. “We project the negative in a completely dark room onto the growing canvas of grass. Where the strongest light is, the grass produces more of the green pigment; where there’s some light, it produces less of it, and where there’s no light, it grows but stays yellow.”
The portraits are best viewed from a distance, as you get closer, the image within the grass will begin to vanish. “It’s like a three-dimensional organic photograph,” Ackroyd said.
“It’s almost like pointillism, except instead of using the points, we’re using the blades.” Added Harvey: “It’s almost like each blade is a pixel, or a brush stroke.”
These organic “photographs” are exhibited in a fresh state only for a short time, excessive light or lack of it eventually corrupts the visibility of the image.

Heather Acroyd and Dan Harvey – sunbathers 2000

Created for HSBC as part of the bank’s partnership with the 2008 Wimbledon Tennis Championships.

‘Bull’ 2003

Photosynthesis ‘Testament’ – ”Taking the intimacy of the portrait and magnifying it to a monumental
scale, bears witness to the passing of time. Imprinted within the thousands of blades of growing grass,
the face became a living landscape. The image emerged as the blades of grass matured into a vibrant
state and then slowly faded as the grass died over the course of the exhibition.”
scale, bears witness to the passing of time. Imprinted within the thousands of blades of growing grass,
the face became a living landscape. The image emerged as the blades of grass matured into a vibrant
state and then slowly faded as the grass died over the course of the exhibition.”

Park ave residant – 2011

”Afterlife” – Ackroyd and Harvey have captured their subjects on a nearby zebra crossing in Vauxhall.”

”Mother and Child” 1998
Source: http://organicgreenroots.wordpress.com/2011/11/29/photosynthesis-growing-photography/
Source: http://organicgreenroots.wordpress.com/2011/11/29/photosynthesis-growing-photography/
Awesome Genetic Photographs
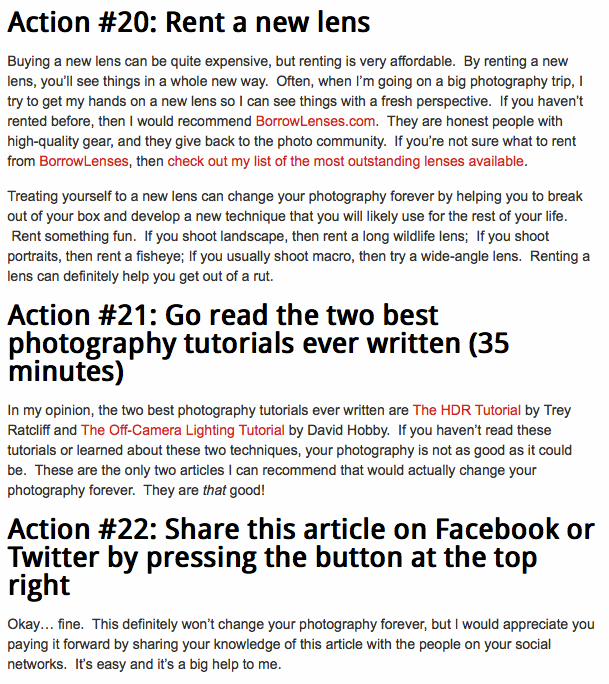
Genetic Portraits is am award-winning photographic series by Quebec-based photographer and graphic designer Ulric Collette. By combining the portraits of two individuals who are related to each other, Collete creates a visual study of genetics.
Here, cousins Justine, 29, and Ulric, 29, are the same age but don't appear to share many similarities until you look closer -- specifically at their jawlines. We wonder how Justine's genetic portraits would compare if she was pictured with Ulric's two brothers!

via http://genetic.ulriccollette.com/
Sources: http://likes.com/weird/awesome-genetic-portraits?page=15&v=eyJjbGlja19pZCI6IDE1NTU0NzI2OTEsICJwb3N0X2lkIjogMjUzNzcwODR9
Sources: via http://genetic.ulriccollette.com/
#14 Twins
20 year-old fraternal twins Alex and Sandrine make an interesting study in this photograph. Alex's face is skinnier, but their shared traits become all the more prominent in this genetic portrait.#13 Two Sisters
Anne-Sophie, 19, and her sister Pascale, 16, blend into one in this genetic portrait. Because the share a similar hairstyle and nearly identical features, the photo looks almost completely natural.#12 Twins
Laurence and Christine are 29 year-old twins who share very different hairstyles and do their makeup rather differently, too. But this picture indeed shows that the two are twins. Their cheekbones, lips, and noses line up almost symmetrically.#11 Mother and Daughter
49 year-old N'sira and her 18 year-old daugther Marie-Pier are the subjects of this portrait. The bone structure similarities are remarkable. N'sira's cheek and jaw show signs of age, but her lips and eyes are nearly identical to those of her daughter.#10 Brother and Sister
29 year-old Karine and 25 year-old Dany share many of the same features and even hair. But if we didn't label the photo as a composition between images of brother and sister, would you have guessed that Karine was female?#9 Father and Daugther
Amélie, 33, and Daniel, 60, are daughter and father. This nuclear family is the most intriguing of all the subjects of the people photographed. The noses are identical in both Amélie's portrait with her dad and her mom. So which one has the dominant gene?#8 Two Sisters
Isabelle, 32, and Amélie, 33, are only a year apart, which makes this portrait all the more interesting. The picture looks almost like a before/after combined portrait we often see in shampoo ads.#7 Father and Daughter
60 year-old Daniel and his daughter Isabelle, 32, make quite a intimidating pair in this genetic portrait. Do you think the daughters look more like Daniel or like their mother Julie?#6 Mother and Daughter
Julie, 61, poses with two of her daughters in this series of pictures. Here, Julie's portrait is combined with that of her daughter Isabelle, 32. Perhaps genetic portraits are a great way to see what you would look like in three decades...#5 Mother and Daughter
If there's one particular family responsible for the most trippy of Ulric Collette's pictures, it's this one! Julie, 61, and daughter Amélie, 33, together look almost naturally as one. In fact, if Julie hadn't over plucked her eyebrows, the resemblance would be even stronger!#4 Daughter and Father
This father and daughter combination looks straight out of a sci-fi film. 10 year-old Ismaëlle and her 32 year-old father together make a scary look both backward and forward in time for this family.#3 Father and Daughter
No, this isn't just some bad photoshop. In fact, upon closer observation, Ariane 13, and her father André, 55, do share a similar facial structure. Don't let the dichotomy in hairstyles and facial hair distract you, just look at the nose!#2 Two Brothers
25 year-old Mathieu and his brother Ulric, 29, together make a trippy photo! Though their eyebrows are different, the shape of their heads and structure of their faces make the difference in eye color a striking combination.#1 Brothers
Ulric appears to resemble brother Christophe, 30, more than he does his younger brother Mathieu. In fact, if it weren't for the discrepancy in eye color and hair length, we would have mistaken this as a portrait of just one person.Sources: http://likes.com/weird/awesome-genetic-portraits?page=15&v=eyJjbGlja19pZCI6IDE1NTU0NzI2OTEsICJwb3N0X2lkIjogMjUzNzcwODR9
Sources: via http://genetic.ulriccollette.com/
10 DIY Lighting Hacks for Digital Photographers
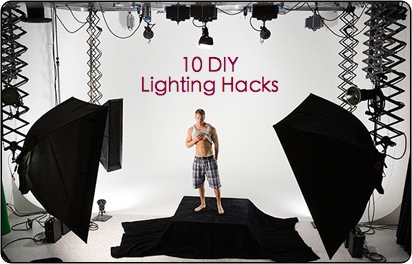 Lighting can be the difference between a good shot and a great one.
 Walk into most professional photographer’s studios and you’ll be confronted with truckloads of lighting equipment. To the average hobby photographer it’s enough to make your mind boggle – and for your stomach to turn as you think about the cost of it all.
Most of us can’t afford a full lighting rig – however what if there was a way to experiment with the type of lighting gear that pro photographers use without spending too much money? What if you could make it yourself.
In this post I’ve found 10 DIY Flash and Lighting Hacks that put some of these lighting techniques within the grasp of the rest of us. Some are more involved than others but all are fun and will provide you with some new lighting gear to experiment with.
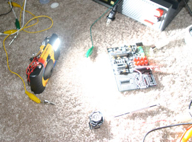
1. Multi-Super-SB-Ring Light
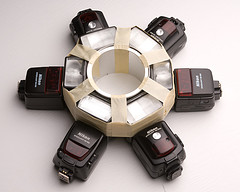 What can you make with six speedlight flashes, a coffee can and a little spare time?
 You get a multi-super-sb-ring-light! (pictured left).
You could probably also blind a small village if you’re not careful!
Find out what it is, how to make one and what the results are like here.
This one looks like a lot of fun to play with – even if it’s just for the challenge of it and the looks you’d get when you pull it out next time you do a shoot..
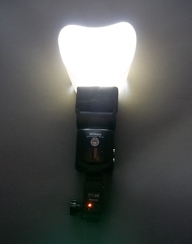
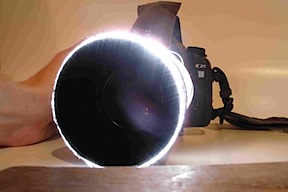
2. Poor Mans Ring Flash
 All you need for this one (pictured left) is a used milk bottle/jug and some scissors.
 The result is that you’ll have a Poor Mans Ring Flash.
A ring flash is one that fits around the lens – it creates a wonderfully unique lighting effect. They will usually lighten your wallet by a couple of hundred dollars.
It’s so simple that I whipped one up for myself today in 5 minutes.
It worked out pretty good too – not bad for the cost of a couple of liters of milk!
If you want to experiment with other methods of making DIY ring flashes you also might want to check out this post for another method. This one is a little more involved, but I think will probably get better results.
3. Inexpensive Light Tent
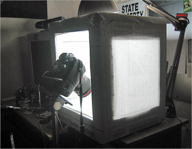 Have you ever wanted to replicate the crisp clean product images that you see in catalogs with the products seemingly floating on a white background?
If you do – you need some kind of light tent/light box.
As usual, light boxes can cost you quite a bit – but thanks to DPS reader Jeffrey Bail you might be able to achieve the results without having to spend much at all.
In our Inexpensive Light Tent tutorial Jeffrey shows you how to turn a box, fabric, tape, glue board and light into a great little light tent.
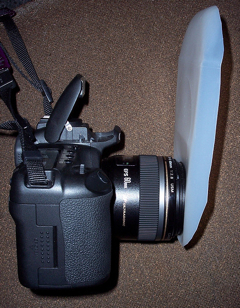
4. Party Bouncer Card
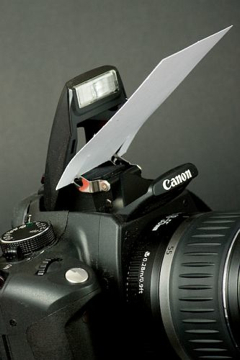 Another cool DIY Hack is this Party Bouncer Card (pictured left) which is so simple yet promises to be so useful and effective.
This one is for those of you with a camera which doesn’t have the capability for an off camera flash.
It allows you to bounce some light off the ceiling while also diffusing the light going forward – this will enable you to get a less harsh flash effect that many flashes leave images with. I like this one as it pushes the light out from your flash in two directions which can lead to a more even light rather than just diffusing it – a little more sophisticated.
Another quick DIY on diffusing a flash is to put a little translucent magic tape over a flash (or a piece of white tissue paper can do it too).
Any of these methods will decrease the amount of light getting out from the flash onto your subject – hopefully resulting in a more subtle light and a less blown out image.
5. Turkey Pan Beauty Dish
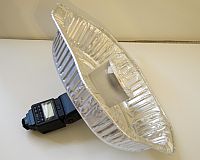 Beauty dishes are wonderful pieces of photographic equipment to experiment with – but they can be very expensive.
 Not any more (at lest if you use this DIY trick).
In this hack learn how to use a simple Turkey Pan to get some pretty amazing beauty dish results! The comparison examples in this tutorial between the turkey pan version and the real thing are pretty convincing.
I must remember to add Turkey Pans to this week’s shopping list.
Check out this tutorial here.
6. DIY Ghetto Flash Extender
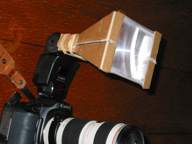 I’d not heard of this type of device before – but since I found this tutorial I’ve discovered a number of photographers who for one reason or another want to be able to extend the reach of their flash.
This is particularly useful for wildlife photographers who want to supplement natural light in tricky lighting with fill flash. Of course sometimes it’s difficult to get close to that animal and a normal flash would have no impact.
Enter the Flash Extender (one popular one is the ‘better beamer’).
Want to make one for yourself? This tutorial for the DIY Ghetto Flash Extender will tell you how.
7. Disposable Camera Flash Slave
 Lately I’ve had more and more questions from readers about how to set up shots with multiple flash units to light a subject from more than one angle.
It’s not difficult to do if you have the budget to buy yourself an extra speedlight flash or two (or more) but if you don’t have the budget is there a way?
In this tutorial and author shows you how to use a disposable camera to act as a remote slave flash.
OK – this tutorial isn’t for anyone looking for a quick simple solution – but it is a challenge that I’m sure some of you will be up for!
8. Flash Mounted DIY Softbox
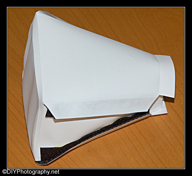 Another way that professional photographers diffuse the light that comes from a flash and gets a nice subtle and even light on their subject is to use a softbox
A softbox sits over a light (it’s a big box with white walls) which ensures the light is spread out evenly.
This DIY Softbox tutorial is great – it requires card, a white sheet (silk if you can), velcro, scissors, glue and the template that the tutorial provides you with.
The results look pretty good – but if you want more DIY softboxes the same site also has another tutorial for an alternative softbox.
Again – this one looks pretty good.
9. Flash Bouncers
 There are a lot of DIY flash diffuser hacks and tutorials around but this one from our friend Chris at DSLRBlog is pretty cool.
It costs £1, takes 5 minutes, requires craft foam, a little elastic and some scissors.
The tutorial even includes a template for you to print out on your printer and then cut out – what more do you need?
Even the technologically challenge could make this one (speaking of myself of course).
Nice work from Chris with that one.
Another similar Flash Bouncer/Diffuser can be found over at DPReview here. This one is foam also.
Lastly – another card/paper version of the flash bouncer.
10. Full Budget DIY Lighting Studio
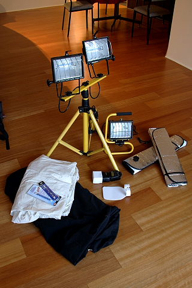 It’s time for one last DIY lighting hack – this one attempts to bring it all together with a full DIY Budget Studio setup.
The author of it takes up the challenge of creating a full studio lighting system for under $75.
It includes lights, reflectors, diffusers and flash diffusers – all using items that you could pick up at hardware and craft stores.
It also shows you a few test shots at the end of the tutorial that compare different lighting options.
You will need your own flash unit to use the flash diffusers on – but the rest is all included in the tutorial.
I particularly light the suggestions around globes for the lights. I know a couple of DPS forum members have had similar success with these sorts of lights.
11. UPDATE: The Fring – a DIY Flash Ring
 I saw this one recently and I think it makes a worthy addition to this post.
It is a DIY Fibre-Optic flash extension for your DSLR’s popup flash!
It uses the light from your camera’s flash to light your subject using fibre optics arranged around your lens to give a more even light.
Of course it’s not the easiest to make (there are 37 steps) but it’s an ingenious idea and the example images taken with the setup are pretty cool considering it cost just a few dollars to make.


Subscribe to:
Posts (Atom)